CSC 581: Mobile App Development
Spring 2019
HW2: MVC Decider & Calculator
Part 1: MVC Decider
Revise your Executive Decision Maker app from HW to utilize a separate Swift struct to generate the decision. The following struct definition allows for specifying a list of possible responses when a Decider is created, and has a getAnswer method for randomly selecting from those options.
struct Decider {
private let options: [String]
init(between options: [String]) {
self.options = options
}
func getAnswer() -> String {
return self.options[Int.random(in: 0..<options.count)]
}
}
You should add a Swift file to your project and enter the Decider struct definition there. Your ViewController should then have a field of type Decider and the appropriate method should be called on that field in the ViewController code. As before, your app should look reasonable on different sized devices and different orientations, meaning that you will have to utilize constraints to position the elements in the screen.
Part 2: Calculator
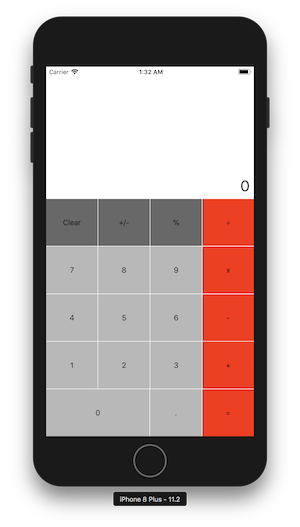
Complete the guided exercises in Lesson 2.10. Then, follow the steps in the Lab at the end of the section to complete the layout of a calculator. This will require you to position a label (for the number value) and 19 buttons (for the digits and operators) using stack views, as described in the Lab. Your app should appear as in the screen capture on the right.
Once you have completed the layout, you are to add functionality so that the calculator behaves just like the basic calculator that comes in the Apple Launchpad. Note that this is a non-trivial task, and you will want to tackle it in stages. For example, you might start with being able to enter a sequence of digits and have them appear in the label. Next, be able to reset the number back to 0 by clicking on the Clear button. Then you can move on to handling the operators (which cause a calculation to be performed). To simplify this step, the definition of a CalculatorModel struct is provided below. This struct carries out the basic steps of the calculator: entering an operator (along with the displayed number) and getting the current value. You should add this struct to your Calculator project and have a CalculatorModel object as a field of your ViewController class. For example, if your CalculatorModel field is named model, executing an addition operation might look something like the following:
model.apply(op: "+", with: Double(displayLabel.text!)!)
displayLabel.text = String(model.currentValue)
Once you have the operators implemented, you can focus on the remaining buttons and the special cases. For example, a number cannot have more than one decimal point - if the user enters more than one decimal point in the same number, all but the first should be ignored. Another special case to worry about is displaying whole numbers. The CalculatorModel stores the running total as a Double, but whole numbers should not be displayed with decimal points. For example, adding "1 + 2 =" should display 3, not 3.0. Your app should look reasonable on different sized devices and different orientations.
EXTRA CREDIT OPTIONS: For full credit, your calculator can differ from the Apple basic calculator in three ways (described below). For extra credit, you can modify your calculator so that it matches the more complex behavior of the Apple calculator.
- For full credit, your Clear button can reset both the number displayed in the label as well as the total stored in the calculator. This differs from the Clear button in the Apple calculator, which has two distinct modes. When you are entering a number in that calculator, the label on the button is "C". When the "C" button is clicked, the number in the label is reset to 0 (but the current value stored in the calculator is unchanged) and the label on the button changes to "AC". When the "AC" button is clicked, the current value in the calculator is reset to 0. Once you start entering digits again, the label reverts to "C".
- For full credit, the "=" button can always apply the previous operator to the total in the calculator and the number in the label when the button is clicked. Thus, if you enter "1 + 2 =" it would display 3. If the previous operator was "=", then the total in the calculator would be unchanged. For example, if you enter "1 + 2 = =" the second "=" would not change the total in the calculator (or in the label). This differs from the "=" button in the Apple calculator, which will repeat the last operation performed. Thus, the second "=" in the sequence "1 + 2 = =" would do another addition of 2, resulting in a total of 5.
- For full credit, the "%" button can simply change the value displayed in the label, by shifting the decimal two places to the left. For example, "33 %" would change the number displayed to "0.33". Note that this affects the value in the label, but would not impact the total in the calculator in any way. This differs from the "%" button in the Apple calculator, which behaves differently if clicked in the middle of an expression. For example, "3 + 10 %" will change the label display to "0.3", which is 10% of 3.
struct CalculatorModel {
    private(set) var currentValue = 0.0
    private var lastOp = "+"

    mutating func apply(op: String, with number: Double) {
        if self.lastOp == "=" {
            self.currentValue = number
        }
        else if self.lastOp == "+" {
            self.currentValue += number
        }
        else if self.lastOp == "-" {
            self.currentValue -= number
        }
        else if self.lastOp == "*" || self.lastOp == "x" {
            self.currentValue *= number
        }
        else if self.lastOp == "/" || self.lastOp == "÷" {
            self.currentValue /= number
        }
        self.lastOp = op
    }

    mutating func clear() {
        self.currentValue = 0.0;
        self.lastOp = "="
    }
}
|
|